

From turning on live captions for your meetings to video recording and sharing, find out below how to level up your Teams meetings by making them more inclusive and effective.
Live captions and transcripts help everyone
If you turn on live captions you can see what’s being said in the meeting in real-time on the screen. Even if you’re the presenter this is only visible to you. Remind your attendees they can do this for themselves!
Benefits
- Helps attendees who have background noise which makes it harder for them to hear
- Helps attendees when speakers have video turned off so lip-reading isn’t possible
How to turn on live captions for yourself
- From the meeting’s control bar, click the elipses ‘…‘
- Select Turn on live captions.
More about live captions (Microsoft guide)
Record a live running transcript of the meeting
To record the live captions in a way that makes them available to anyone who joins the meeting you can select ‘Start transcription‘. This makes it easier for everyone to follow the meeting dialogue.
Benefits in addition to live captions:
- If someone joins the meeting late: they can scroll back up to quickly see what they missed!
- Helps with note taking and action recording: the transcript is available for anyone to view later and can be downloaded as a Word document and corrected if needed.
How to turn on live transcription
- From the meeting’s control bar, click the elipses ‘…‘
- Select Start transcription
- Tell your attendees how to view the live transcript: from the meeting’s control bar, click the elipses ‘…‘ and click ‘Show transcript‘
Captions for recorded video
Just like live captions described above, they benefit everyone at times. If you record a video of an online meeting, captions are required for accessibility. Captions can also make your video more findable in searches: they are searched by Google etc to help people find what they are looking for.
Luckily Stream does the majority of the work for you!
Use the auto-generated captions, and correct any errors
- Make sure auto-generated captions (subtitles) are turned on before you record
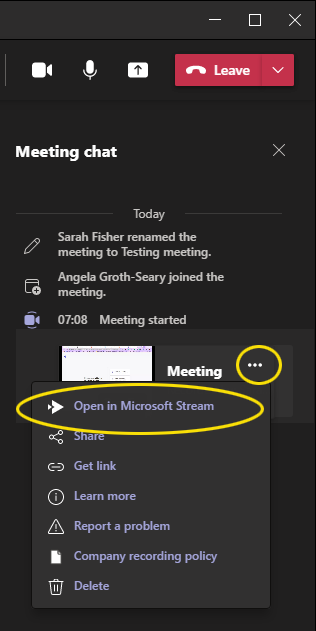
- Once the recording is done, open the video in Microsoft Stream (in the meeting chat, click the ellipses next to the video file, then the option to open it Stream)
- You should see the transcript/captions displayed next to the video. As the video owner you can click the edit button (a pencil icon) to correct the text and add any contextual information as needed.
If you’ve already got a video with unedited auto-generated captions in Stream, and your video hasn’t been watched for six months, these captions may be removed. To renew them, edit the video details and turn the autogenerated captions off and back on again. Take the opportunity to quickly check and correct any caption errors before you save!
Check your lighting if using video
If you intend to speak during a meeting, make sure your room has adequate lighting and turn your video on if possible. Wearing dissimilar colors to your skin tone will help too. The greater contrast makes it easier for your camera to show your face more clearly, assisting lip readers.
Share material in advance
Share the slides you intend to present, and any handouts in advance if you can. This gives your attendees the option to become familiar with the topic in advance, which will help them follow the presentation more easily. This is especially useful for those with dyslexia or hearing impairments. Remember to check and fix any accessibility issues for the documents being shared:
Keyboard shortcuts and voice assistants
Tell your participants how to access the meeting or event with keyboard shortcuts or voice assistance, by sharing this Microsoft advice with them:
- Keyboard shortcuts for Microsoft Teams
- Using a screen reader to join a meeting in Microsoft Teams
- Voice control advice: Using Cortana voice assistance in Teams and Windows Speech Recognition commands
Sharing your video beyond the team chat
When you record a meeting in Teams, the recorded video is pasted into your meeting chat and stored in Stream, and a link is emailed to meeting participants.
If you want to share it further, do not share it from Teams – this opens it up to the entire University, which might have data protection issues. Instead, click the ellipses next to the video and choose ‘Open in Microsoft Stream‘
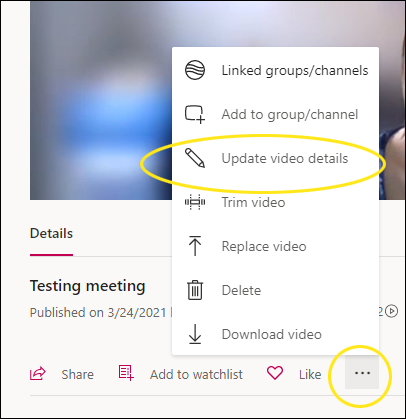
When viewing the video in Stream, click the ellipses below the video, then in the popup menu, click the Pencil icon ‘Update video details‘ link.
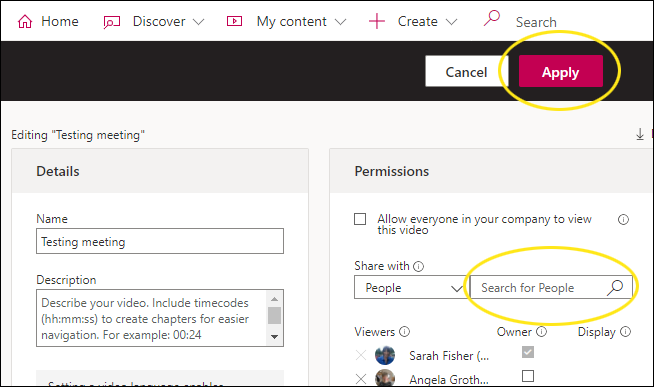
Enter a name into the search box (in the permissions section) and click the magnifying glass to select their name. To confirm this change, you need to then click Apply in the banner above.
More advice about Teams, video and Stream
- Staff guide to using Stream
- Staff guide to running meetings in Teams
- Microsoft advice for editing video details, including permissions