
For some time we had wanted to implement SSO on our Papercut installation but any form of SSO was not supported by Papercut. With release 13.4 this changed and we began to look at the options. Papercut supports Integrated Windows Authentication and Webauth options for SSO, with Webauth being the most suitable for our setup. The Papercut instructions assume you will be running Apache or similar in front of it to undertake the Service Provider (SP) role but ideally we wanted to use as much native Microsoft infrastructure as possible and so we used IIS along with the Application Request Routing (ARR) module.
We already had IIS in front of Papercut to force users from port 80 to 443 so our starting state may be slightly different to people using just the default 9192 but you can just ignore the instructions for switching ports around if so.
At the end of these instructions you’ll have IIS with ARR and a Shibboleth SP installed on the same server as the Papercut application.
One word of warning – if you implement SSO you’ll stop any Papercut internal accounts from being able to authenticate. We still allow direct onsite access to Papercut on 9192 as a workaround to this.
Step 1 – Install Shibboleth
1. Shutdown Papercut to prevent any issues whilst configuring Shibboleth (you will need to restart the server anyway)
2. Download the latest Shibboleth SP win32/win64 binary from here and verify the sha256/sha1/md5 signature as appropriate
3. On the Papercut server install the Web Server (IIS) role is installed along with the ISAPI Extensions and ISAPI Filters which are under Application Development and also the full set of IIS6 Management Compatibility features.

4. Run the Shibboleth installer on the Papercut server. The instructions assume you’ve just selected the default options from this point on.
5. Restart the server when prompted.
6. Verify the Shibboleth 2 Daemon (Default) service is running (If it isn’t you will want to check the log files in C:\opt\shibboleth-sp\var\log\shibboleth, especially shibd logs)
Step 2 – Configure Shibboleth
1. You will need to edit the file C:\opt\shibboleth-sp\etc\shibboleth\shibboleth2.xml (you will need to use an elevated editor to edit the file if UAC is enabled, and if UAC isn’t enabled you might want to reconsider that!) in order to change the defaults to something that will work. The changes we needed to make were to the following sections:
<InProcess logger=”native.logger”>
<ISAPI normalizeRequest=”true” safeHeaderNames=”true”>
<Site id=”1″ name=”printing.kent.ac.uk”/>
</ISAPI>
</InProcess>
This tells Shibboleth which IIS site to associate with. If you only have one site the ID will be 1, if you have more you will have to choose appropriately.
<RequestMapper type=”Native”>
<RequestMap>
<Host name=”printing.kent.ac.uk”>
<Path name=”secure” authType=”shibboleth” requireSession=”true”/>
<Path name=”user” authType=”shibboleth” requireSession=”true”/>
</Host>
</RequestMap>
</RequestMapper>
Here we set the hostname for the service as presented to the end users and also define the paths that Shibboleth will protect. The secure path is a default and one we use for testing and user is the one used for Papercut (we’ve chosen only to enable SSO for user logins, not for admins).
<ApplicationDefaults entityID=”https://printing.kent.ac.uk/shibboleth”
REMOTE_USER=”eppn persistent-id targeted-id uid”>
Next we set the entityID and choose what attributes to populate the REMOTE_USER variable with. IIS doesn’t actually do this properly, but I added uid for completeness. You can probably leave this out if you wish.
<Sessions lifetime=”28800″ timeout=”3600″ relayState=”ss:mem”
checkAddress=”true” handlerSSL=”true” cookieProps=”https”>
To increase security we make sure SSL is forced for connections and cookies.
<SSO entityID=”https://sso.id.kent.ac.uk/idp”>
SAML2
</SSO>
This sections sets the location of our IdP and we only support SAML2 so other options have been removed.
<MetadataProvider type=”XML” file=”C:\opt\shibboleth-sp\etc\shibboleth\idp_metadata.xml”/>
Finally we set the locate of the file that will hold the IdP metadata once we’ve downloaded it.
2. We need to edit one more file in order to pass the attribute holding the users identifier to Papercut. We use the LDAP attribute uid but it’s really up to you.
Edit the file C:\opt\shibboleth-sp\etc\shibboleth\attribute-map.xml. In our case we only want to pass on uid so the entire file consists of the following:
<Attributes xmlns=”urn:mace:shibboleth:2.0:attribute-map” xmlns:xsi=”http://www.w3.org/2001/XMLSchema-instance”>
<Attribute id=”uid” name=”urn:oid:0.9.2342.19200300.100.1.1″/>
</Attributes>
You may well have to tweak the section in bold to match your own environment.
3. Restart the Shibboleth service and then restart the IIS site Shibboleth is associated with. From painful experience I’ve found that not restarting the IIS site causes odd inconsistencies and so must be done along with the service restart whenever a change is made to shibboleth2.xml.
4. Grab a copy of your new SPs Metadata, usually by going to https://<servername>/Shibboleth.sso/Metadata and submit this to the people that manage your Idp.
5. Get a copy of the IdPs metadata and put this on the Papercut server in C:\opt\shibboleth-sp\etc\shibboleth\ as a file called idp_metadata.xml (or whatever you decided to call the file in the previous section).
6. Once these steps are done you should be able to browse to /secure or /user on the Papercut server and go through the user SSO login process. You can check you have a valid session by going to https://<servername>/Shibboleth.sso/Session and also check that you can see uid in the attributes section of this page. If this is all working okay we can proceed to installing and configuring ARR.
Step 3 – Install ARR
1. Download ARR from here and take appropriate steps to verify the download. This install uses the web installer and so requires external access but the download page does have information on doing a manual installation.
2. Open IIS manager and verify a new option called URL Rewrite is available.
Step 4 – Configure ARR
ARR is going to allow us to send our traffic from IIS to the Papercut application. We also use it to force users to HTTPS. A number of rules are needed to allow this, along with some exceptions to allow Shibboleth to work correctly.
Prerequisite – Enable ARR Proxy mode
- In IIS Manager select the website that Shibboleth is associated with and open URL rewrite
- Select Add Rule from the Actions pane on the far right of the screen
- In the window that opens select Reverse Proxy and click OK
- When prompted allow Proxy mode to be enabled
- Click cancel in the rule creation dialog (as we don’t actually want to create a rule in this way)
- Select Add Rule from the Actions pane on the far right of the screen
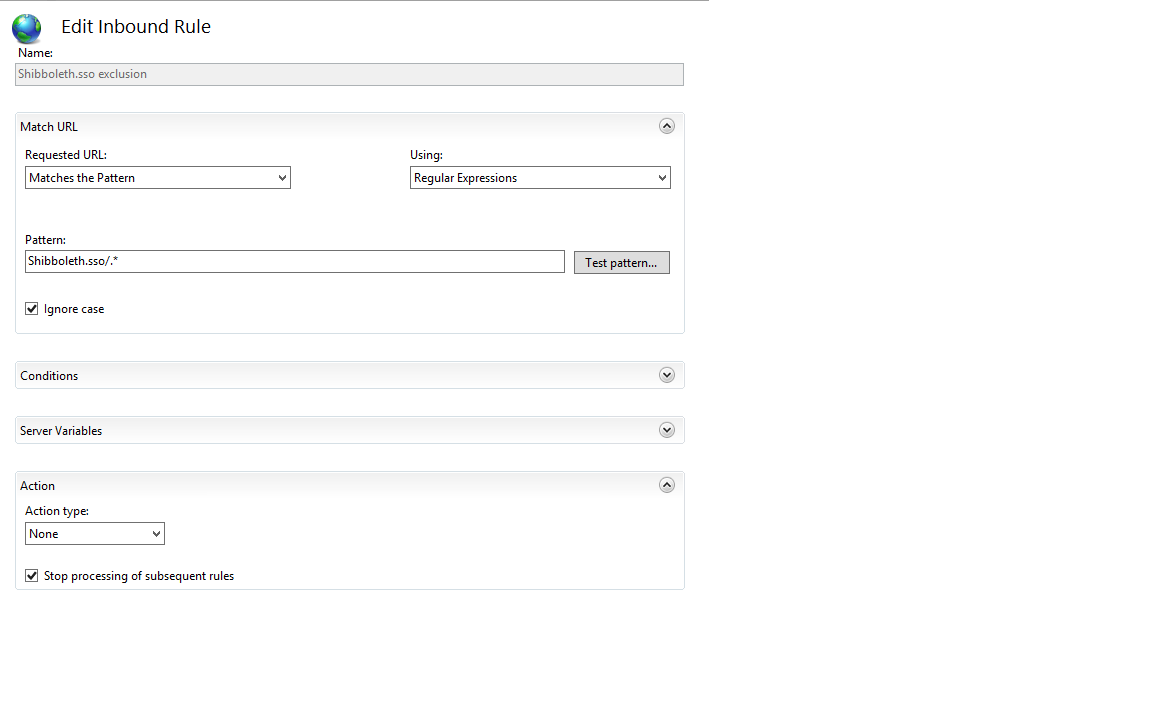
Shibboleth.sso exclusion
- In IIS Manager select the website that Shibboleth is associated with and open URL rewrite
- Select Add Rule from the Actions pane on the far right of the screen
- In the window that appears select Blank Rule and click OK
- Give the rule a sensible name
- Make sure Requested URL is set to Matches the Pattern and Using is Regular Expressions
- In Pattern enter Shibboleth.sso/.* and leave ignore case ticked
- Change Action type to None and tick the Stop processing subsequent rules
- Click Apply in the right hand pane and then click Back to Rules
- Select Add Rule from the Actions pane on the far right of the screen
If configured correctly the rule should look like the screenshot below.
Proxy to Papercut
- In IIS Manager select the website that Shibboleth is associated with and open URL rewrite
- Select Add Rule from the Actions pane on the far right of the screen
- In the window that appears select Blank Rule and click OK
- Give the rule a sensible name
- Make sure Requested URL is set to Matches the Pattern and Using is Regular Expressions
- In Pattern enter (.*) and leave ignore case ticked
- Expand Conditions and click Add
- Set Condition Input to {SERVER_PORT_SECURE}
- Set Check if Input string to Matches the Pattern
- Set Pattern to ^1$ and click OK
- Change Action type to Rewrite
- Set Rewrite URL to https://127.0.0.1:9192/{R:1}
- Tick Append query string
- Tick Stop processing subsequent rules
- Click Apply in the right hand pane and then click Back to Rules
- Select Add Rule from the Actions pane on the far right of the screen
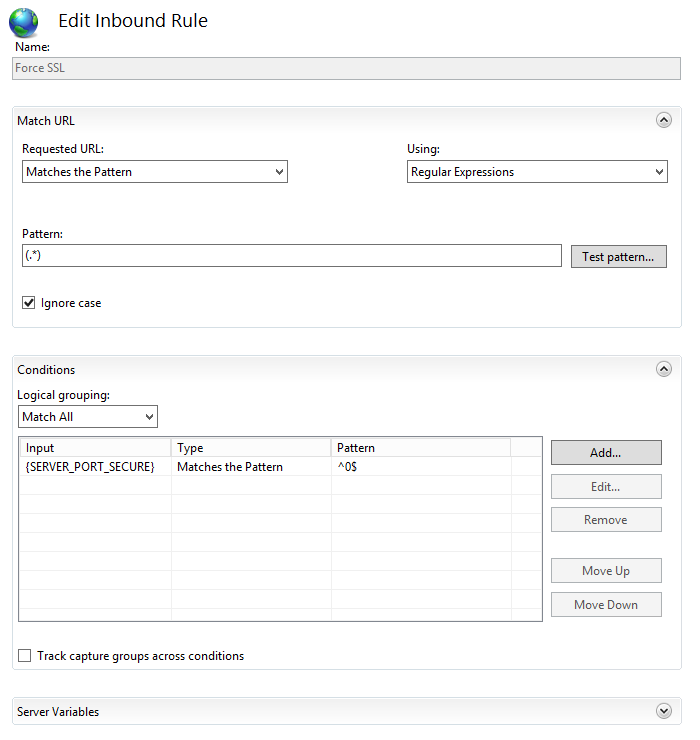
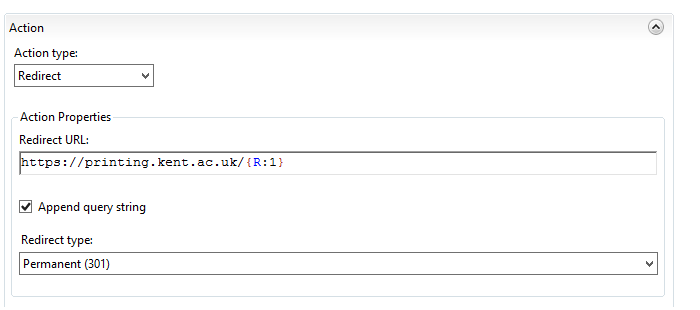
The two screenshots below show the configured settings above


Proxy to Papercut
- In IIS Manager select the website that Shibboleth is associated with and open URL rewrite
- Select Add Rule from the Actions pane on the far right of the screen
- In the window that appears select Blank Rule and click OK
- Give the rule a sensible name
- Make sure Requested URL is set to Matches the Pattern and Using is Regular Expressions
- In Pattern enter (.*) and leave ignore case ticked
- Expand Conditions and click Add
- Set Condition Input to {SERVER_PORT_SECURE}
- Set Check if Input string to Matches the Pattern
- Set Pattern to ^0$ and click OK
- Change Action type to Redirect
- Set Rewrite URL to https://printing.kent.ac.uk/{R:1}
- Tick Append query string
- Set the Redirect Type to Permanent (301)
- Click Apply in the right hand pane and then click Back to Rules
- Select Add Rule from the Actions pane on the far right of the screen
The screenshots below show the configuration
Ordering
The screenshot below shows the correct order of the rules which is:
- Shibboleth Exclusion
- Proxy to local Papercut
- Force SSL
The shibboleth exclusion rule is needed to allow Shibboleth to function, for example the Session information lives under /Shibboleth.sso. Therefore this rule is first and any rules after that are not evaluated if this triggers.
The proxy to Papercut rule handles the rewriting to the actual Papercut Application server. However this rule will only fire if SSL is in use (the {SERVER_PORT_SECURE} variable being set to 1). If the rule does fire then no more rules are evaluated.
Finally the force SSL rule fires if the connection is not secure and redirects the connection to the secure website. This will prompt the rules to be evaluated again and the proxy to Papercut rule to trigger.
Step 5 – Configure Papercut
- Check the Papercut configuration files (<Install_Directory>\PaperCut {MF,NG}\server\server.properties) and ensure that Papercut is listening on 9191 and 9192 and not 80 and 443.
- Start the Papercut Application Server service
- Login to Papercut admin (/admin) and then selction Options->Advanced
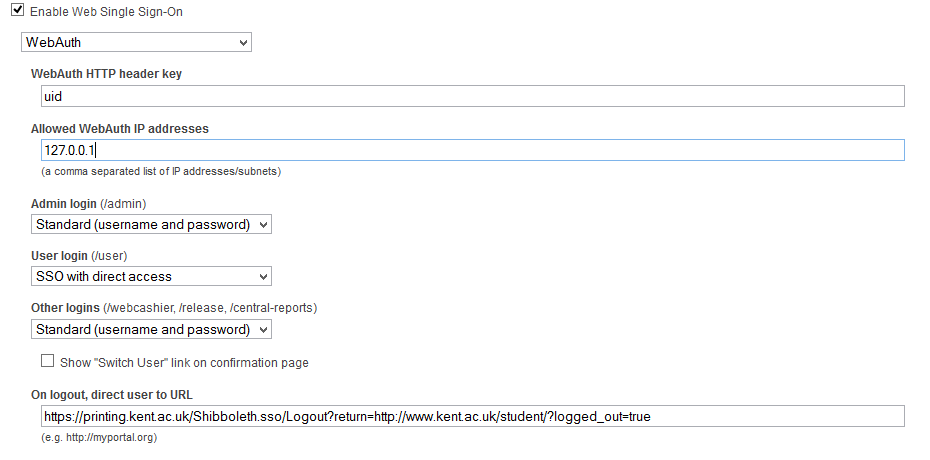
- In the Web Single Sign-On (SSO) tick Enable Web Single Sign-On
- In the Dropdown select Webauth
- Set the Webauth HTTP header key to be uid (or whichever attribute you have chosen and configured)
- Set Allowed webauth Ip addresses to 127.0.0.1 and the address of the local papercut server
- Choose which services to protect with SSO, we only do this for /user
- Set the logout URL to something appropriate, we use https://printing.kent.ac.uk/Shibboleth.sso/Logout?return=http://www.kent.ac.uk/student/?logged_out=true
- Click Apply
You should end up with settings like the following:
The End
At this point you should be able to SSO into the user area of Papercut and do some thorough testing to ensure everything works as intended.